
オープンソースのビデオ会議ソフト Jitsi Meet
昨今のコロナ禍対策でテレワークの需要が急増 ビデオ会議、Web会議等 呼び方はいろいろだが有効なツールが数多く存在している ZOOM,Teams, Google Meet 等サーバーを自前で建てることなく無料で使える様です。Jitsi Meet も同様にサーバーは不要ですが、オーブンソースの為、自前でサーバーを立てる事も出来ます。オンプレにサーバーを立てればセキュリティは格段に向上します。OSS無料なのでどんな感じかサーバーを構築してみました。
環境
Azure Ubuntu 18.04.4 LTS メモリ:2ギガ サイズ:Standard B1ms vCPU 数:1
インストールと設定
OSのインストールは割愛
手順1 スワップパーティション追加 とりあえず後で
スワップの確認方法
# free
# cat /proc/meminfo
# swapon -s
手順2 マシンのホスト名と完全修飾ドメイン名(FQDN)を設定する
root@jitsi:~# hostname
jitsi

root@jitsi:~# cat /etc/hosts
127.0.0.1 localhost

# The following lines are desirable for IPv6 capable hosts
::1 ip6-localhost ip6-loopback
fe00::0 ip6-localnet
ff00::0 ip6-mcastprefix
ff02::1 ip6-allnodes
ff02::2 ip6-allrouters
ff02::3 ip6-allhosts

sed -i 's/^127.0.1.1.*$/127.0.1.1 jitsi.example.com jitsi/g' /etc/hosts ←これをやっても何も変わらず

root@jitsi:~# cat /etc/hosts
127.0.0.1 localhost

# The following lines are desirable for IPv6 capable hosts
::1 ip6-localhost ip6-loopback
fe00::0 ip6-localnet
ff00::0 ip6-mcastprefix
ff02::1 ip6-allnodes
ff02::2 ip6-allrouters
ff02::3 ip6-allhosts

root@jitsi:/etc# hostnamectl set-hostname jitsi   一応 ←を実行しておいた

# vi /etc/hosts /etc/hosts      手動編集した
127.0.0.1 localhost
127.0.0.1 jitsi.example.com jitsi ← 追加

# The following lines are desirable for IPv6 capable hosts
::1 ip6-localhost ip6-loopback
fe00::0 ip6-localnet
ff00::0 ip6-mcastprefix
ff02::1 ip6-allnodes
ff02::2 ip6-allrouters
ff02::3 ip6-allhosts
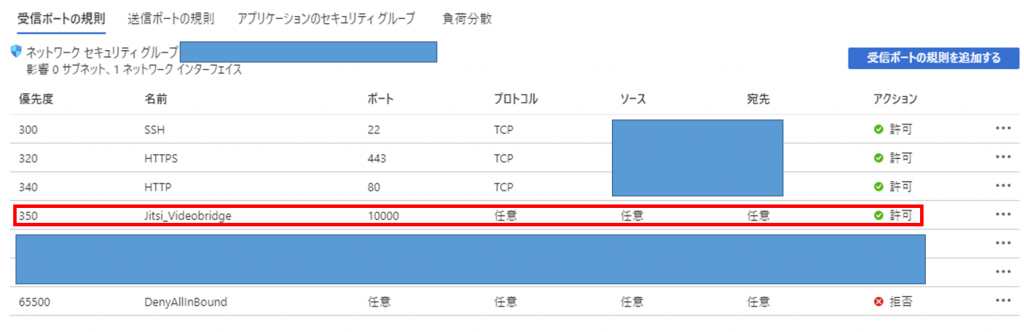
手順3 ファイアウォールの設定 Azureの管理画面で設定
手順4 システムを更新する
root@jitsi:~# apt update
apt upgrade -y && sudo shutdown -r now
手順5 OpenJDK Javaランタイム環境(JRE)8をインストールする
root@jitsi:~# apt install -y openjdk-8-jre-headless

root@jitsi:~# java -version
openjdk version "1.8.0_252"
OpenJDK Runtime Environment (build 1.8.0_252-8u252-b09-1~18.04-b09)
OpenJDK 64-Bit Server VM (build 25.252-b09, mixed mode)
さらに、JAVA_HOMEを次のように環境変数を設定
root@jitsi:~# echo "JAVA_HOME=$(readlink -f /usr/bin/java | sed "s:bin/java::")" | sudo tee -a /etc/profile
root@jitsi:~# source /etc/profile
手順6 Nginx Webサーバーをインストールする
root@jitsi:~# apt install -y nginx

root@jitsi:~# systemctl start nginx.service
root@jitsi:~# systemctl enable nginx.service
Synchronizing state of nginx.service with SysV service script with /lib/systemd/systemd-sysv-install.
Executing: /lib/systemd/systemd-sysv-install enable nginx
root@jitsi:~# systemctl status nginx
● nginx.service - A high performance web server and a reverse proxy server
Loaded: loaded (/lib/systemd/system/nginx.service; enabled; vendor preset: enabled)
Active: active (running) since Mon 2020-06-08 11:22:55 JST; 1min 9s ago
Docs: man:nginx(8)
Main PID: 5268 (nginx)
Tasks: 2 (limit: 2232)
CGroup: /system.slice/nginx.service
tq5268 nginx: master process /usr/sbin/nginx -g daemon on; master_process on;
mq5270 nginx: worker process

6月 08 11:22:55 jitsi systemd[1]: Starting A high performance web server and a reverse proxy server...
6月 08 11:22:55 jitsi systemd[1]: nginx.service: Failed to parse PID from file /run/nginx.pid: Invalid argument
6月 08 11:22:55 jitsi systemd[1]: Started A high performance web server and a reverse proxy server.
手順7 Jitsi Meetをインストールする
最新のUbuntuまたはDebianシステムでは、公式のJitsi debリポジトリを使用してJitsi Meetを簡単にインストールできます。まず、システムにJitsiリポジトリーをセットアップ。
root@jitsi:~# wget -qO - https://download.jitsi.org/jitsi-key.gpg.key | apt-key add -
gpg: 有効なOpenPGPデータが見つかりません。
Jitsi ダウンロードサーバーがダウンしているらしい
4,5時間待って再度トライしたらダウンロードできたっぽい
root@jitsi:~# wget -qO - https://download.jitsi.org/jitsi-key.gpg.key | apt-key add -
OK

root@jitsi:~# sh -c "echo 'deb https://download.jitsi.org stable/' > /etc/apt/sources.list.d/jitsi-stable.list"
root@jitsi:~# apt update -y
ヒット:1 http://azure.archive.ubuntu.com/ubuntu bionic InRelease
取得:2 http://azure.archive.ubuntu.com/ubuntu bionic-updates InRelease [88.7 kB]
取得:3 http://azure.archive.ubuntu.com/ubuntu bionic-backports InRelease [74.6 kB]
取得:4 http://security.ubuntu.com/ubuntu bionic-security InRelease [88.7 kB]
取得:5 https://download.jitsi.org stable/ InRelease [1,882 B]
取得:6 https://download.jitsi.org stable/ Packages [44.0 kB]
298 kB を 3秒 で取得しました (112 kB/s)
パッケージリストを読み込んでいます... 完了
依存関係ツリーを作成しています
状態情報を読み取っています... 完了
パッケージはすべて最新です。
Jitsi Meet のインストール(簡単で良くできている感じ)
root@jitsi:~# apt install -y jitsi-meet
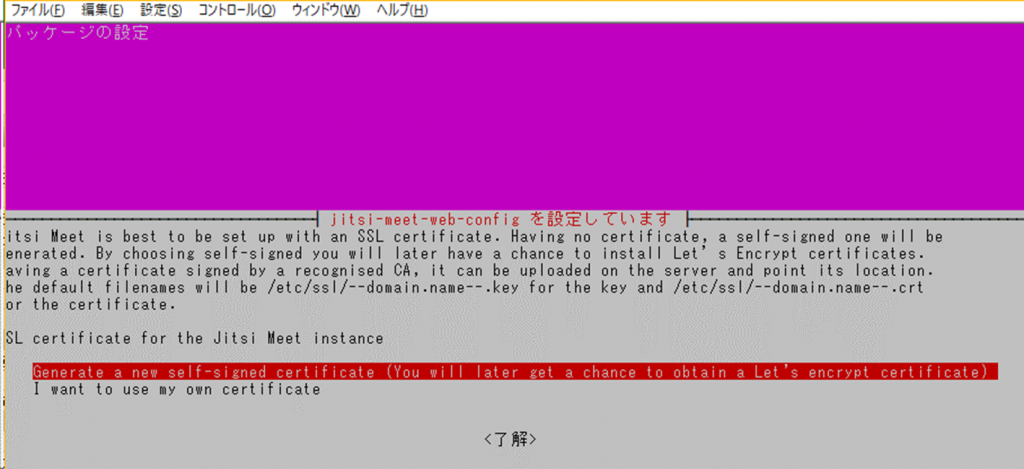
SSL証明書のところで一番下の「I want to use my own certificate」ではなく 下から2番目の Let’s encrypt を選択
Let’s Encrypt のインストール
次のスクリプトを使用して、Let’s Encrypt SSL証明書を申請
root@jitsi:~# /usr/share/jitsi-meet/scripts/install-letsencrypt-cert.sh
まず メールアドレスの入力を求められるので入力してエンター
IMPORTANT NOTES:
- Congratulations! Your certificate and chain have been saved at:
/etc/letsencrypt/live/jitsi.example.com/fullchain.pem
Your key file has been saved at:
/etc/letsencrypt/live/jitsi.example.com/privkey.pem
Your cert will expire on 2020-09-06. To obtain a new or tweaked
version of this certificate in the future, simply run certbot-auto
again. To non-interactively renew *all* of your certificates, run
"certbot-auto renew"
- Your account credentials have been saved in your Certbot
configuration directory at /etc/letsencrypt. You should make a
secure backup of this folder now. This configuration directory will
also contain certificates and private keys obtained by Certbot so
making regular backups of this folder is ideal.
- If you like Certbot, please consider supporting our work by:

Donating to ISRG / Let's Encrypt: https://letsencrypt.org/donate
Donating to EFF: https://eff.org/donate-le

Configuring nginx
Jitsi Meet 調整と機能追加
ユーザー認証機能を追加
prosody は動いている
root@jitsi:~# systemctl status prosody
● prosody.service - LSB: Prosody XMPP Server
Loaded: loaded (/etc/init.d/prosody; generated)
Active: active (running) since Mon 2020-06-08 16:52:22 JST; 18h ago
Docs: man:systemd-sysv-generator(8)
Tasks: 1 (limit: 2232)
CGroup: /system.slice/prosody.service
mq22187 lua5.1 /usr/bin/prosody

6月 08 16:52:22 jitsi systemd[1]: Stopped LSB: Prosody XMPP Server.
6月 08 16:52:22 jitsi systemd[1]: Starting LSB: Prosody XMPP Server...
6月 08 16:52:22 jitsi prosody[22164]: * Starting Prosody XMPP Server prosody
6月 08 16:52:22 jitsi prosody[22164]: ...done.
6月 08 16:52:22 jitsi systemd[1]: Started LSB: Prosody XMPP Server.
6月 08 16:52:22 jitsi prosody[22187]: portmanager: Error binding encrypted port for https: No key present in SSL/TLS
6月 08 16:52:22 jitsi prosody[22187]: portmanager: Error binding encrypted port for https: No key present in SSL/TLS
lines 1-15/15 (END)
/etc/prosody/conf.avail/jitsi.example.com.cfg.lua 変更
VirtualHost "jitsi.example.com"
-- enabled = false -- Remove this line to enable this host
-- authentication = "anonymous"    ← 認証方法をパスワードにするためコメントアウト
authentication = "internal_plain"   ← 認証方法をパスワードに
-- Properties below are modified by jitsi-meet-tokens package config
guest.がないとマイク カメラが選択できないらしいので以下追加
VirtualHost "guest.jitsi.example.com"
authentication = "anonymous"
c2s_require_encryption = false
/etc/jitsi/meet/jitsi.example.com-config.js 変更
var config = {
// Connection
//

hosts: {
// XMPP domain.
domain: 'jitsi.example.com',
anonymousdomain: 'guest.jitsi.example.com',  ← 追加
/etc/jitsi/jicofo/sip-communicator.properties 変更
org.jitsi.jicofo.BRIDGE_MUC=JvbBrewery@internal.auth.jitsi.example.com
org.jitsi.jicofo.auth.URL=XMPP:jitsi.example.com  ← 追加
再起動して設定を有効に
# systemctl restart prosody jicofo jitsi-videobridge2
ユーザーはコマンドで管理するっぽい
ユーザー登録しなくてもクライアントとしてWeb会議に参加できるが、ユーザー登録しておけば会議の主催者としてまた、会議室の作成ができる
root@jitsi:/var/lib/prosody# prosodyctl register user1 jitsi.example.com password
root@jitsi:/var/lib/prosody# prosodyctl adduser user1@jitsi.example.com
That user already exists
ユーザー一覧
root@jitsi:/var/lib/prosody# ls -l /var/lib/prosody/*/accounts/*
-rw-r----- 1 prosody prosody 40 6月 8 16:52 /var/lib/prosody/auth%2ejitsi%2eexample%2ecom/accounts/focus.dat
-rw-r----- 1 prosody prosody 40 6月 8 16:52 /var/lib/prosody/auth%2ejitsi%2eexample%2ecom/accounts/jvb.dat
-rw-r----- 1 prosody prosody 38 6月 9 13:04 /var/lib/prosody/jitsi%2eexample%2ecom/accounts/user1.dat
初めてアクセスした際の言語を日本語にする
/etc/jitsi/meet/jitsi.example.com-config.js
// Default language for the user interface.
// defaultLanguage: 'en',
defaultLanguage: 'ja',
ログの抑制
ログは /var/log/jitsi jvb.log
とにかくデフォルトのままだとログがでかい。
/etc/jitsi/videobridge/logging.properties 編集
#java.util.logging.ConsoleHandler.level = ALL
java.util.logging.ConsoleHandler.level = SEVERE
設定を反映させるために、サービスを再起動
サービス一覧
root@jitsi:/etc/jitsi/videobridge# systemctl list-unit-files --type=service
root@jitsi:/etc/jitsi/videobridge# systemctl restart jitsi-videobridge2.service
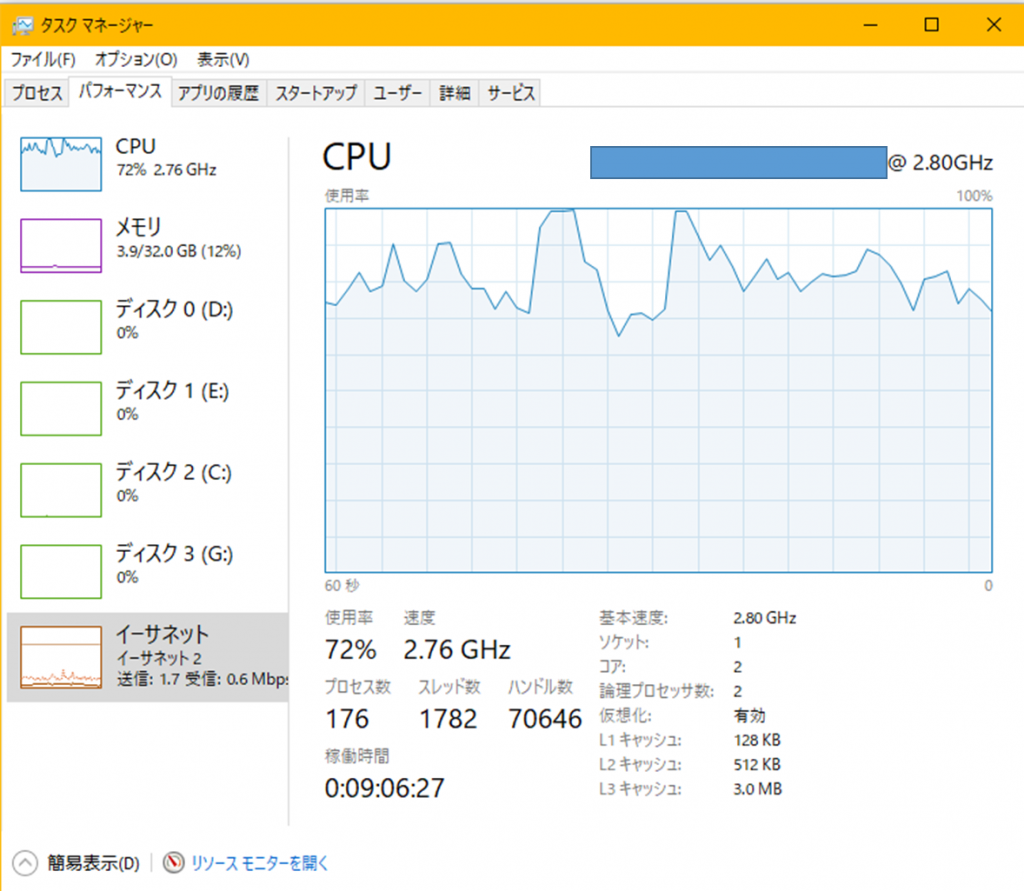
クライアントPCの負担を減らす (再起動等は不要)
クライアントのCPU負荷が高い様だ ブラウザで動作するWeb会議ソフトのせいか
/etc/jitsi/meet/jitsi.example.com-config.js
// Media
//

// Audio

// Disable measuring of audio levels.
// disableAudioLevels: false,
disableAudioLevels: true,  ←追加した
// audioLevelsInterval: 200,
jitsi meet 参加中のクライアント
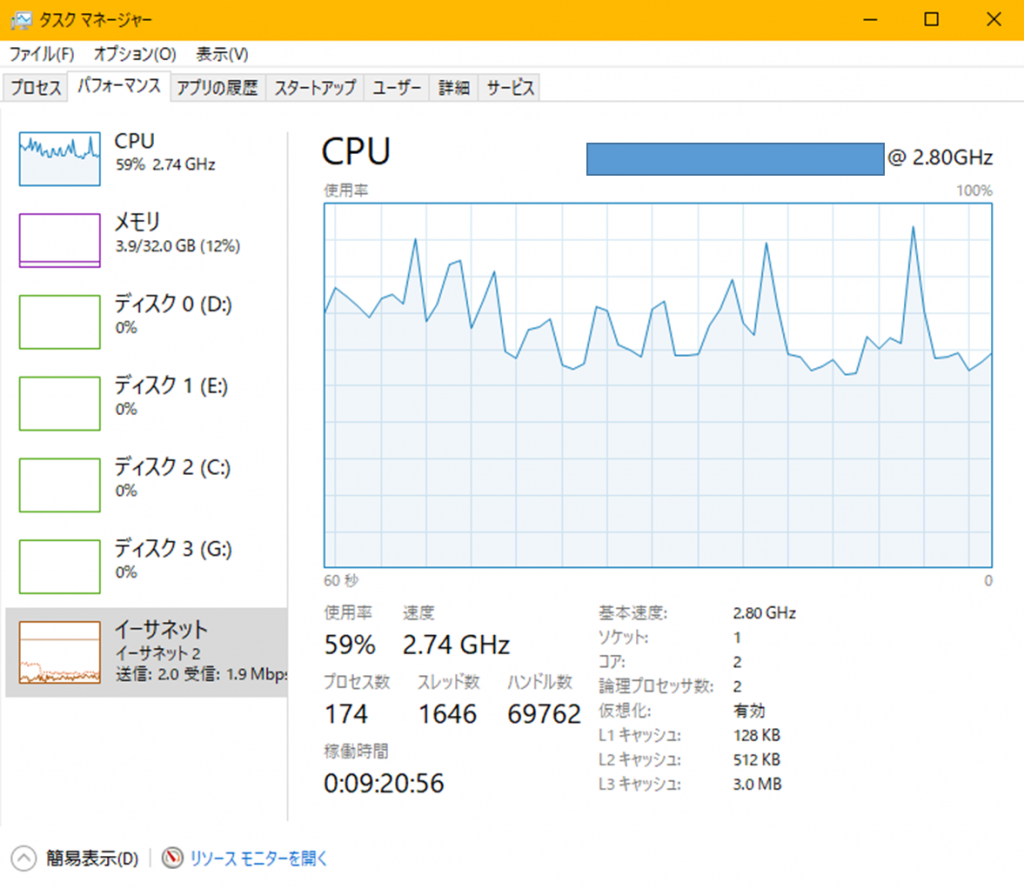
/etc/jitsi/meet/jitsi.example.com-config.js
disableAudioLevels: true, 追加後 多少CPU負荷減ったかも
jitsi meet 参加中のクライアント
参考: Jitsi Meet 参加してない時のクライアント
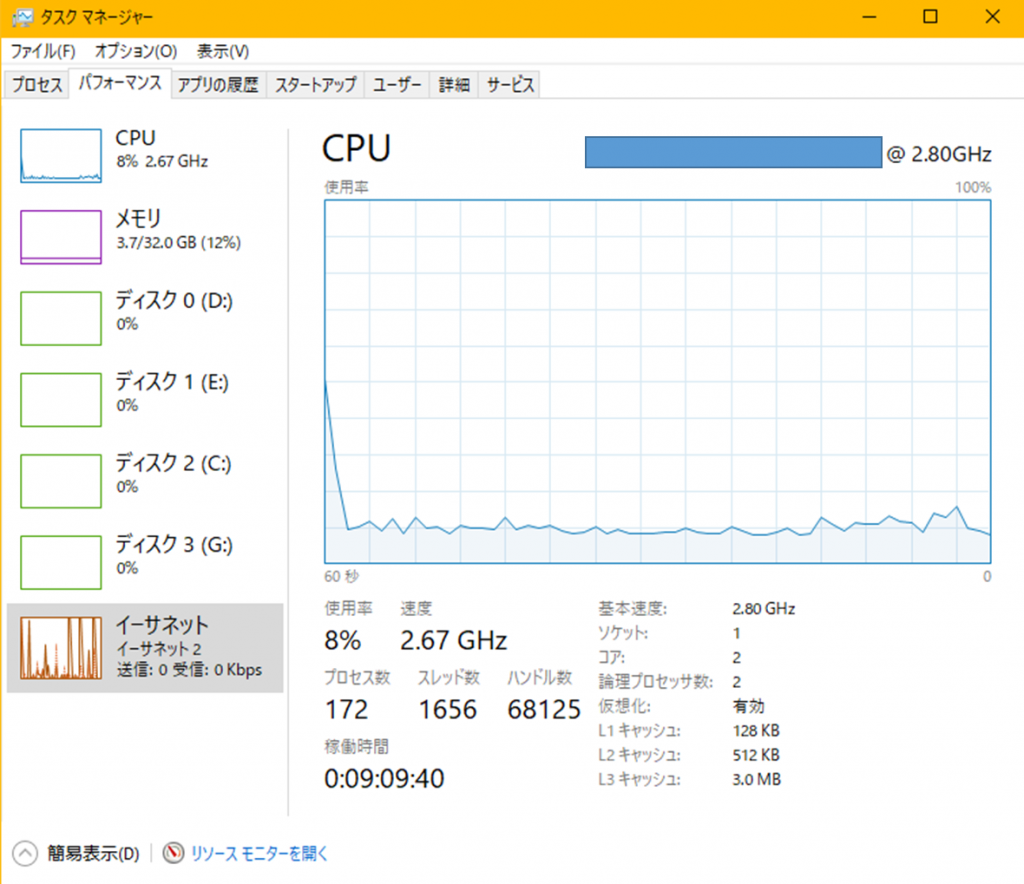
クライアントの起動画面
まとめ
CentOS の利用が多いのだが Jitsi Meet は Ubuntu 推奨の様です。が、CentOS の事例も見かけます。インストールしてみての感想はインストールが容易で非常にありがたい!特にインストール作業の流れの中で .sh一発でそのまま Let’s Encrypt のインストール設定が完了した。何度か Let’s Encrypt インストールしたが今回は一番らくちんに感じた。感謝!
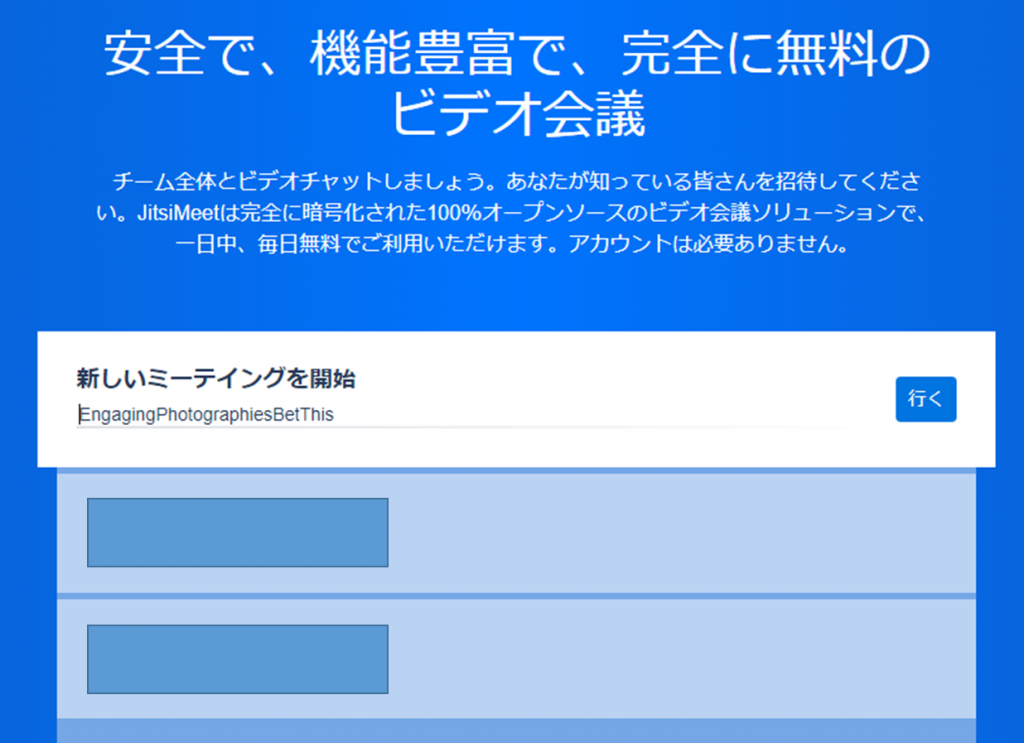
Jitsi Meet サーバー起動してビデオ会議やってみた。カメラ設置してリモートと対話できて感動した。時間無制限で無料、なんとも有難い。テレワークで使えそう。


コメント